How to convert a comic book
When you convert your comic, there are several settings you can change.
TL;DR
- Choose the file you want to convert.
- Select "Step 1: Preview"
- Click on Convert.
- Check that the slicing is correct. If not, make the desired changes.
- Click on Convert to HTML player or Convert to separate images.
- Download result with Download result
- Enjoy!
Note that by default, first page will be considered as a cover and will be kept "as is".
If the first page is not a cover and contains panel, please remove the custom settings.
Long version
Input
As input, you can choose between a remote URL or a local file.
The following files are accepted:
| Type | Extension |
|---|---|
| Comic file | CBR CBZ |
| Archive containing images | 7Z RAR ZIP |
| Single image | BMP JPEG PNG WEBP |
| Text file containing list of URLs to images | TXT |
Input URL:
Basic settings
Use original images
For "Export to HTML player" only.
When checked, images will not be converted and will be kept "as is".
Export image format
JPEG or WEBP.
WEBP format will provide a better quality / file size ratio than JPEG, but is not supported by every image viewers.
Export image quality
The desired quality. Higher is better. Max is 100.
Advanced settings
Right-to-left
Check this option if your comic book is written from right to left.
You can apply this setting for a specific page in "Custom settings" with the following syntax:
where "X" is the page number.
Crop only
With this option checked, panels will not be sliced as usual. Only a smart crop (remove useless borders) will be applied on the page.
In this exemple, only the part outlined in red will be kept and outside white borders will be removed.
You can apply this setting for a specific page in "Custom settings" with the following syntax:
where "X" is the page number.
Don't slice if there are more than X panels in the page
If there are too much panels in the page, page will not be sliced and kept "as is" because it's probably a style effect.
You can apply this setting for a specific page in "Custom settings" with the following syntax:
where "X" is the page number.
Apply blur of pixels
Before finding edges of panel, apply a blur effect on the picture. This is usefull when the comic is scanned and there is some grain on the images. Bluring them will ease the detection.
The more artifacts there are, the more blur you'll want to apply.
You can apply this setting for a specific page in "Custom settings" with the following syntax:
where "X" is the page number and Y the number of pixels. Use "0" if you don't want to blur.
Ignore panels smaller than X % of the page
With this option, panels that are too small will not be kept. For exemple, the page number in the footer.
You can apply this setting for a specific page in "Custom settings" with the following syntax:
where "X" is the page number and Y is a percentage (from 0 to 100).
Edge detection threshold
In order to find the edges, images are considered in black and white. This threshold is the limit where a color is considered black or white. This values varies between 1 (pure black) and 255 (pure white).
If the filling of your comic are pure white, you can use a high value (near 240).
If the filling of your comic is darker, you can use a lower value.

In this comparison, the parts outlined in red will be sliced.
You can apply this setting for a specific page in "Custom settings" with the following syntax:
where "X" is the page number and Y the threshold value.
Custom settings
If you want to apply specific settings for specific pages, you can use the custom settings.
It's a JSON text area.
On top of the above settings, if you have seen a problem in the preview, you can also :
- Specify you want to keep a specific page "as is" with the following syntax:
where "X" is the page number you want to keep "as is".
- Specify the panels you want to exclude for a specific page with the following syntax:
where "X" is the page number and Y, Z the panels you want to exclude.
- Specify a specific page you want to exclude (because it's a white page, an ad, ...) with the following syntax:
where "X" is the page numberyou want to skip.
Exemple:
Preview
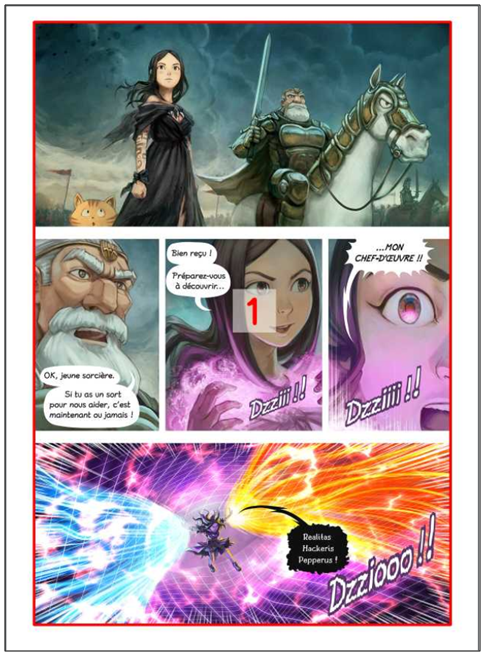
The "preview mode" allows you to see the result you will have. For each page, each panel is surrounded in red.
You can see the result of the threshold (a black and white image) with « ⬕ »
If you want to override the default settings, you can check "Overwrite default"
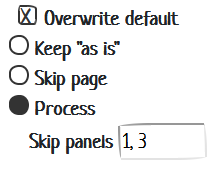
and choose one of this behavior:
- Keep "as is": will keep the full page and won't try to find panels. Usefull for covers. By default, the first page is kept "as is".
- Skip page: will totally skip the page. The page will not be included in the export.
- Skip panels: you can specify the list of panels you want to skip (because they are not usefull panels).
All changes will be automatically applied in the "Custom settings" text areas.
When your settings are fine, you can run the preview again, or click on the Convert to HTML player or Convert to separate images button.